Compositing is a great way to expand possibilities in your photography. One of the most important techniques in creating a composite is by removing your subject from the background. Petro Vlahos, the creator of the blue screening (same technique used for green screens), which enabled everything from the delivery of weather forecasts on TV, to dancing penguins in Mary Poppins, died this month at the age of 96. With this in mind, I thought I would share a great technique in how to isolate a high key background (blue or green) so that it can be removed, leaving only your subject standing in front.
Get a High Key Monochrome Backdrop
Personally, I use muslins. Especially for composites, the wrinkles won't matter, so a muslin will end up being cheaper than seamless paper. But, painted plywood or bedsheets will work as well, if you can get the right size and color.
I'm not going to discuss the details of setting up and shooting the picture in this article, so let's start from the point where we already have a picture loaded up in Photoshop.
Convert to LAB Color Mode
First thing you want to do, is convert the color mode to LAB. This is done by going into the "Image" menu, then going to "Mode" and finally select "Lab Color"
What is LAB Color Mode?
By default, the image will be loaded up in RGB mode, or Red Green Blue. This is essentially how your screen will display the image, all colors are made up by varying the intensity of the red, green, and blue channels.
LAB mode however, works differently. According to Wikipedia, LAB color mode is "a color opponent space with dimension L for lightness, and an A and B for the color opponent dimensions based on non-linearly compressed color space coordinates." If that doesn't make sense, don't worry, it's not really that important. All we need in this mode is to duplicate the A channel, which depicts the position of the colors between red and green, and we're done here! So let's continue.
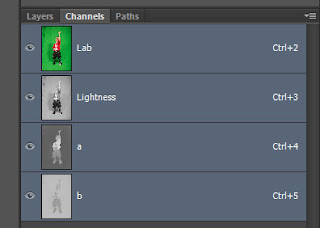
Once you are in LAB color mode, you will see the L/A/B channels in your channels tab.
Since in this case we are working with green, we want to duplicate the A channel (which as mentioned above, is based on the intensity of red vs. green). To do this, simply drag the A channel down to the "New Channel" icon at the bottom of the window. You will end up with this...
Now that that is done, we no longer need to be in LAB mode, so we can switch back to RGB mode.
(Image menu -> Mode -> RGB)
Isolating the Green
This is where the magic happens. Photoshop has a blend mode called "Overlay," which I end up using a lot. What overlay is, is a combination of the "Multiply" blend mode, and the "Screen" blend mode. Multiply will darken the darker parts of the image, while Screen will lighten the brighter parts of the image. By combining these two blend modes, we are quickly able to isolate the green on the A channel we duplicated from our LAB color mode.
Step 1: Ensure that the a copy channel is highlighted. Your image will look something like this:
Step 2: Fill with white, using overlay. From your edit menu, select Fill. Then make sure you are filling with white, with a blend mode of Overlay and an opacity of 100%.
You will get an image that looks something like this:
Step3: Fill with black, using an overlay blend mode and 100% opacity.
You will get a result similar to this:
Step 4: Fill with black again. :) Same as step 3 above. Below is a sample result:
Step 5: Fill with white again! Same as step 2 above. Below is a sample result:
Note that you must do the fills in this order! White, black, black, white. If you do it in a different order, the results will not be as clean.
Step 6: At this point, with the exception of a few blemishes you will notice that the background is pure black, and the subject is pure white. You will probably want to zoom in and fix the areas that didn't result in pure white on the subject using the regular methods. Remember, our goal here is to get pure white on pure black.
Step 7: Hold down Control (Command on the Mac) and click the "a copy" channel. This will make the channel you just created the active selection.
Step 8: Enable the RGB channel again, and then go back to the layers tab. Also, make sure the layer is NOT a background layer (if it is, drag the lock on the layer to the trash bin).
Step 9: Apply the layer mask by clicking on the layer mask icon at the lower corner. The result will be similar to this:
And you're done! You are now free drop on any background you choose.
Conclusion
With a few simple steps, steps that can even be recorded into a custom action and automated, we can quickly strip out a high key monochrome background, making compositing very easy!
If you've found this article helpful, please visit my Facebook Page!


THANK YOU!!!!A lot!!!
ReplyDelete